
Polymer Clay Dog Gargoyle Tutorial
Fun, free, & fabulous this polymer clay dog gargoyle tutorial is bound to make you bark with the dogs.
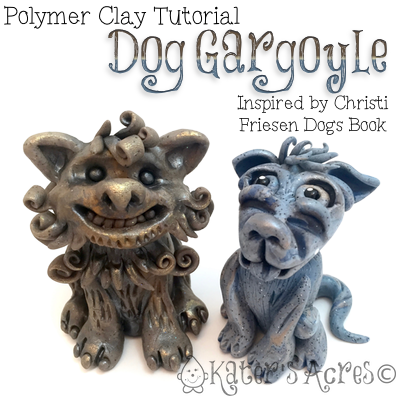
If you’ve been around KatersAcres for awhile, you already know that every once in awhile Christi Friesen and I get together and plan some fun and exciting things for you. This month has been filled with some of those fun things, including several giveaways of her newest book “Dogs.” This week we’re doing something ultra special … this week’s fun includes a free tutorial inspired by Christi’s Guardian Dog in her book, as well as THREE awesome prizes to be given away. [Psst: You’ll have to come back on FRIDAY to enter the big giveaway though.]

Materials Needed:
- Christi Friesen “DOGS” Book
- Polymer Clay in any colors of your choice
- X-acto knife or Clay Blade
- Needle Tool
- Pasta Machine
- Polymer Clay Oven
- Varnish
- Acrylic Paint to Add an Antique Finish (CLICK HERE for tutorial on how to do this)
Polymer Clay Dog Gargoyle Tutorial Instructions:
 First, choose your colors and create your own “rock-ish” blend.
- Note: One of my favorite techniques is Christi’s “lookat” blend
- Portion your clay into sections from largest to smallest: body, head, 4 legs, tail, & ear portions.
- Using the largest section, roll a teardrop for the body.
- TIP: I made my dog gargoyle to look like my Mocha Latte, a lab coonhound mix. Her chest is big and bulky with a skinny tummy, so I turned my teardrop so the fat size was UP and the skinny side was down.
- Follow the instructions in Christi’s “DOGS” book to create the back two paws & legs.
- Blend the seams for stability and to help the pice look like a “rock.”
- Don’t forget to add some toes to your figurine.
- Use the second largest section and roll another teardrop.
- Place it on the top of the large teardrop and blend the seams.
- Add a mouth and a nose.
- TIP: Noses will vary depending on the breed of dog you are sculpting.
- Add the tail onto the back and blend the seam.
 Use a sculpting tool to create sockets for the eyes.
- Take two pea-sized rounds of clay and insert as eyes.
- Add facial wrinkles or fur as needed depending on dog breed.
- Add ears in the size, shape, and style of your particular dog breed.
- Add the front paws as shown in Christi’s “DOGS” Book and blend the seams.
- For an “instant aged effect” use chalk powders to accent the figurine. [Watch the video here]
- Take a good look at your dog and add any fur, curls (as shown in Christi’s Foo Dog), wrinkles, or other dog-like features.
- Bake at 275 degrees (if using Premo!) in your dedicated polymer clay oven for 45-60 minutes.
- Allow to completely cool in oven.
- Remove and place your new dog gargoyle in a place where he can forever sit and watch over your home.

SHARE WHAT YOU’VE MADE:
Did you use this tutorial to make your own creation? Share it with my readers & the world by using
#KatersPCTutes
on your social media accounts.
Do you have ideas for another tutorial you’d like me to post here on the blog? Send me your ideas.
The Friesen Project
The Friesen Project and all Christi Friesen related teaching, giveaways, etc is done in conjunction with Christi Friesen. All tutorials are retaught here with her expressed permission. Please make sure to read about the project here, and get answers to the most common FAQS here.
Thanks for joining me today,

