

Knowing how to marble clay to your liking takes time, patience, and experimentation. I’ll be honest, in many cases when I was first starting out I made some major mistakes … not enough marbling, too much marbling, choosing the wrong colors to put together. Marbling is a fantastic technique that can bridge the gap from a delicate and lightly streaked look, like Christi Friesen’s “lookat technique” (click here to get the free tutorial from the Friesen Project) to flat out striped!

Today I’m going to share with you a polymer clay marbling tutorial. This is a marbling technique that I use very often in my creations, mostly for dragons & forest creatures. I’m sure that I’m not the first person in the world to do this, but I’ve adapted a faux stone technique to bright colored clay to make a “shattered marble” technique. The reason I call this “shattered marbling” is because you are going to manipulate the clay in such a way that the original colors are maintained and not all swirled together to make a variegated blend. With this polymer clay marbling tutorial, you can see every individual color you originally put into the clay. This is a very simple process, but like standard marbling will take some time & patience to get used to.
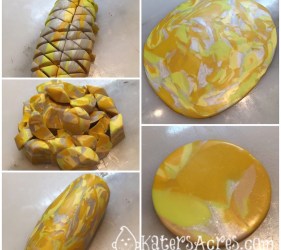
- First decide on the colors of polymer clay you’d like to marble. I used sunshine, cadmium yellow, pearl, ecru, & translucent for the marble palette seen at right.
- Take all of the colors and make a big wad of clay. It doesn’t matter what colors are next to each other … just make a log.
- Now chop the log up! (The same way you would for my faux turquoise or faux jade recipe.)
- Once all the clay is chopped, put it back together into a new log.
- Repeat as often as many times as you’d like until the color “pieces” in your mix are as small as you’d like.
- When you have achieved a blend that looks good, cut your log it in the middle, lengthwise, and run each portion through the pasta machine.
- The picture on the top right is one section run through the pasta machine.
- Once your clay has been run through the pasta machine, you can cut portions to use in your projects.
I hope this brought some new ideas for you and marbling today. Try it and let me know what you think in the comments below.

Thanks for joining me today,
Happy Claying,
