How to Add a Patina to a Polymer Clay Item

Posted on 10 Comments
How to Give a Finished Polymer Clay Piece an Antique Finish on Kater's Acres Blog https://katersacres.com

Sometimes your polymer clay pieces need an extra something, just a touch of something special to bring out the details that you have embedded into the clay.  When you have carved or engraved your clay, you will often want to accent those pieces after they have finished baking.  Many artists call this adding a patina to polymer clay.  Other artists call it antiquing an item.  For today’s mini-tutorial, we’re going to call it an “antique finish.”  There are many ways to do this, but this is the way that I find the easiest…

Continue reading How to Add a Patina to a Polymer Clay Item

How to Embed a Bead into Polymer Clay

Posted on 7 Comments
Mini-Tutorial How To Embed a Bead Into Polymer Clay by KatersAcres

 How to Embed a Bead Into Polymer Clay

Sometimes It’s NOT as Easy As It Looks

For anyone who’s a self taught polymer clay artist, you’ve already made some critical mistakes in claying.  You tried a shortcut (that didn’t work) or tried a way to do something that ended up ruining your piece.  It’s okay, don’t worry, we’ve all been there.  This month we are going “back to basics” in creating with polymer clay.  So for today’s mini tutorial we’re going to go over the proper way to embed a bead into polymer clay.

Continue reading How to Embed a Bead into Polymer Clay

How to Properly Condition Your Polymer Clay

Posted on 35 Comments
Polymer Clay on KatersAcres Blog https://katersacres.etsy.com

How to Condition Polymer Clay Blocks the Right Way on KatersAcres Blog

How to Condition Polymer Clay

There is a lot of information on the internet about how to condition polymer clay.  There are even people saying that there’s no need to condition clay if it is soft (gasp)!  2013 is going to bring lots of talk of polymer clay and all things sculpting to Kater’s Acres blog, the biggest of which is The Friesen Project.  Because of this, all during the month of January, I am going to talk about some of the basics of polymer clay.  With so much incorrect information on the web, it’s really hard to know what it correct.

Continue reading How to Properly Condition Your Polymer Clay

DIY Polymer Clay Salt Scrub Hand Soap for Your Studio

Posted on 27 Comments
DIY Salt Scrub Recipe for Polymer Clay Artists & Crafters - Less Than $1 per Jar on https://katersacres.com - Repin Now, Make Later

It’s no secret that I love a good DIY project.  What’s also no secret is that if I can make it myself better, more simply, and more cost-effective, I’ll likely do it.  So for my polymer clay tip today, I have decided to share my recipe for my super-easy hand scrub to keep your hands from becoming clay stained and a super quick washing solution between colors.  This recipe using things you likely have already in your kitchen, as well as a recycled baby jar (thank heavens for my friends who keep me supplied with them).

WHY MAKE THIS SALT SCRUB:

Have you ever finished a project and washed your hands with soap and water and gone “ew!” because there was yucky clay scum left behind?  Well, I have!  And it is because of this that I decided to make my own salt scrub.  Please note that this is a super simple version of a fancier version (that calls for scented oils, specialty moisturizing oils, etc).  Some versions call for sugar instead of salt, but my studio is downstairs and sugar tends to attract ants, especially when I leave the lid off the jar, which is often … therefore I use salt, which doesn’t attract bugs and in emergencies can be used on slugs … although I’ve never had any of those in my basement … moving on!
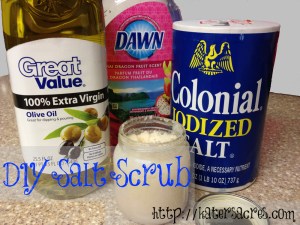
WHAT YOU’LL NEED:

For most of my readers, you have already mentally checked these things off in your head because you have them at your house.  Please know that you can use any kind of oil [even vegetable oil or coconut oil]; I prefer EVOO because it leaves my hands nice and softie-soft!  You can use any kind of dishwashing or hand soap.  I prefer Dawn as my choice for dishwashing soap for its awesome cleaning power, but you can use any soap.  The reason that there are no added “scents” to my recipe is that my dish soap is already scented … I mean why should I ruin that awesome Thai Dragon Fruit smell that Dawn has given me?  PS: If you haven’t tried this scent yet, you should … it’s my favorite.

EDITOR’S NOTE: Thai Dragon Fruit Scent has been discontinued as of 2018.

HOW TO DO IT:

DIY Salt Scrub Recipe for Polymer Clay Artists & Crafters - Less Than $1 per Jar on https://katersacres.com - Repin Now, Make Later

Here’s the easy part.  This recipe is for a SMALL jar (approximately 2.5 oz), you will need to tailor this recipe to fit your jar.

  • 1 Tbs. EVOO
  • 1 Tbs. Dish Liquid
  • 1/4 cup salt

All you need to do is stir it all together inside your jar!  And then wah-lah! You have an awesome homemade, ultra-cheap, DIY salt scrub that you can use to get all those clay bits off of your hands once and for all.

A FEW NOTES:

You want this mixture to be semi-dry.  The salt should stick together, but it should be loose, but still able to be packed.  If there is oil or soap “floating” in spots in your mixture, keep stirring.  If there is still oil or soap in there, add more salt until it is all absorbed.  Feel free to keep a spoon next to your mixture, just so that between washings of your hands, you can stir your mix so the oil & soap don’t settle to the bottom.  I also tend to “shake” my bottle before I use it.  This also helps to keep it nicely mixed.


Sculpting Blessings,

KatieSignature

How to Keep Your Precious Creations from Burning & Cracking

Posted on 13 Comments
How To Keep Your Polymer Clay Creation from Burning or Cracking by KatersAcres


How To Keep Your Polymer Clay Creation from Burning or Cracking by KatersAcres

There is truly nothing that makes me more sad and angry than spending hours making something gorgeous only for it to burn & or crack.  This is horribly frustrating for every polymer clay artist.  Today I’m going to give you my best hints, tips, & tricks to preventing this.  We’re going to go back to basics and learn how to bake polymer clay.

In my opinion, cracking objects is often worse than burning objects.  Objects that are burned can often be covered or disguised by antiquing, covering in a paint medium, using Perfect Pearls, or even Swellegant‘s line of products by Christi Friesen.  However, when a project cracks, there is not a lot that you can do.

Continue reading How to Keep Your Precious Creations from Burning & Cracking

HELP: My Polymer Clay is Rock Hard

Posted on 14 Comments
Hard Clay Questions Answered on KatersAcres Blog

Yes, I Will Help You

Your Questions Answered

[dropcap]I[/dropcap] have recently been receiving several questions sent to me privately from some of my readers.  I try to answer all questions as quickly as they come in.  Feel free to ask me a question anytime and I will answer it directly or here on the blog.

Since this is the first time I have reposted an email that has come to me, I thought it best not to use the name of the person who sent the email.  For this reason, I have “named” the letter and the person who wrote to me in the letter.

Continue reading HELP: My Polymer Clay is Rock Hard

Polymer Clay Tip: Using a Heat Embossing Tool

Posted on 6 Comments

On Tuesdays, I love to bring you a little polymer clay tidbit, tip, or trick.  Today is no different.  I’m going to be sharing with you how to use a Heat Embossing Tool with polymer clay.  This versatile tool finds its home in scrapbookers & card makers closets.  But as clayers, we share with a variety of arts, crafts, and mediums…and therefore…we stole this tool and claimed it as our own too.


Continue reading Polymer Clay Tip: Using a Heat Embossing Tool

Tutorial: Cut Millefiori Canes Like a Pro

Posted on 7 Comments
Cut Perfect Millefiori Cane Slices with this Quick Tutorial from Kater's Acres

One of the hardest things to do is to cut a cane in an even, thin slice, without any drag.  When I first began working with polymer clay millefiori canes, both raw & baked, I had the hardest time cutting them in thin, even slices.  One side would always be thicker than the other or I’d adjust my blade halfway through the slice and create very unpleasant “drag marks” on the sliced piece of cane.  After several years, I got smart and solved my problem…

It’s not easy to cut a millefiori cane with accuracy and precision every time.  Trust me, I know.  But there are a few things that you can do to make your millefiori cane cutting adventures a little easier.

Continue reading Tutorial: Cut Millefiori Canes Like a Pro

Polymer Clay Brand Review for Sculptors

Posted on 24 Comments
Polymer Clay Blocks

“I only use one brand of polymer clay.”

Has someone said this to you before?  Or have you said it yourself?  Maybe someone has said to you, “I only use Fimo Classic polymer clay.”  In either case, I call this the “polymer clay snob syndrome.”  I’ll be honest, I too prefer a certain brand of clay over others, however, I will use whatever I have and often times clay that I have found on sale or on clearance.  So why am I against “polymer clay snob syndrome?”

Continue reading Polymer Clay Brand Review for Sculptors

Hard Clay Blending Technique

Posted on 21 Comments
Easy Blend Polymer Clay Technique by KatersAcres

Hard Clay? No Problem!

My Easy Blending Polymer Clay Tip No Special Tools Required

One of the things that every clayer struggles with at times is rock hard clay.  Clay that does nothing but snap, break, and never get soft.  The easiest answer to this problem is a food processor.  But, you may not have a food processor and that’s okay.

Today’s polymer clay tip will show you how to become friends with your clay, warm it up, soften it, make it malleable again, and even blend it to perfect.  In fact, with this easy polymer clay tip, you don’t need any special tools or machines.  You only need your hands, clay blade, acrylic roller and pasta machine.

Continue reading Hard Clay Blending Technique

Embossing with Powders a Polymer Clay Tutorial

Posted on 12 Comments

Embossing with Powders a Polymer Clay Tutorial

Have you ever taken the time to emboss something on your clay?  I love to emboss patterns, stamps, and whatever kind of texture “catches” me at that moment.  I love the crisp, clean, almost effortless and yet professional look it gives to my pieces.  One of the hardest things for me however, is embossing with powders (i.e.: Pearl ex, Perfect Pearls, etc).  A lot of clayers have problems with this as well.

I’ve read many articles that say you should slightly dampen your stamps first.  *Sigh*  This still didn’t help me.  The result was half on and half off, dark in some places and not in others, you get the idea…I just wasn’t happy with the results.  And I always emboss things…so I needed a solution that was quick, easy, and stress free.

Continue reading Embossing with Powders a Polymer Clay Tutorial