The Friesen Project of 2013 Presents:
Friesen Friday Once Again
Well another Friday is here! Can you believe that we have done 16 tutorials together? Today’s tutorial makes number 17. Awesome! For those of you who have stayed with me throughout every project and every challenge, I commend you for taking the time to get back to claying. I started this project with one goal in mind: to explore polymer arts, meet clayers from around the world, and get people to fall in love with polymer again. Many of you have written to me and told me how much you appreciate the tutorials and the project. Thank you for the letters & emails – I’m honored to take this journey with you! Today’s tutorial is not found in Christi’s book, it’s just from me to each of you … from way down under, the Tasmanian Devil!
As with all the tutorials in the Friesen Project, please remember that these tutorials are done in an abbreviated format, with Christi Friesen’s expressed permission. These tutorials are written and designed to be used in conjunction with the Beyond Sculptures Book 5: Down Under.

Materials:
- Polymer Clay
- Pasta Machine or Acrylic Brayer
- Kemper Circle Cutters
- Tiny-medium sized beads for eyes
- Craft Oven to bake your figurine
Polymer Clay Tasmanian Devil Tutorial
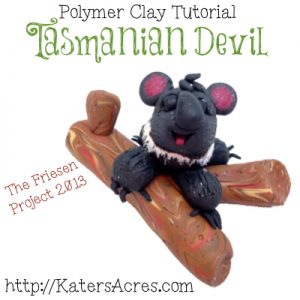
You can see that adorable Tasmanian Devil above … we’re going to make something just like him. Tasmanian devils don’t look anything like the Warner Brother’s version … a real Tasmanian Devil almost looks like something you’d want to snuggle up with … almost.
Gather black, white, & red polymer clay.
- Condition your black clay (I added a touch of granite clay from Fimo into mine to give it some pizazz).
- Using your Kemper circle cutter cut out 4 large circles (one for each “paw”) and three small circles (one for a tail and one for each ear).
- Condition the remaining clay and divide in in two portions about 2/3 (for the body) to 1/3 (for the head) parts.
- Next, roll the two slabs into balls.
- Roll the larger ball into a more oblong shape.
- Arrange your parts as shown at left.
Next roll a white snake. This white snake will form the chest stripe on the Tasmanian Devil.
- Attach the white stripe between what would be the shoulder areas.
- Blend in the white top and bottom of the stripe to make “fur” for your Tasmanian Devil.
- Once your stripe is blended, shape the remaining ball into a soft triangle like shape to give the Devil his longer nose.
- At this point if you want your sculpture to sit on something (like a log, grassy prairie, in a river, on a box, etc) place it there now so you can do his features properly and give him/her an expression that suits it.
Once your critter is situated on your ornamentation, it’s time to add your facial features.
- Take two of your small circles and add ears. I make all my ears by forming cones and embedding them into the ear area and shaping them after they are situated on the sculpture.
- As you can see from the picture above, the inside of the ears are pinkish red – cute huh?
- Before you are finished add your eyes, eyebrows, nose, hair, & mouth in any position that will suite your figurine.
- NOTE: Remember nothing is permanent until you bake it. I didn’t like the first nose that I made, so I redid it and it’s almost a koala type of a nose … much better!
[hr /]
The Friesen Project
The Friesen Project is done in conjunction with Christi Friesen. All tutorials are retaught here with her expressed permission. Please make sure to read about the project here, and get answers to the most common FAQS here.
[hr with=top /]
Echidna’s Made by Project Participants
The echidna’s below were made by some of the participants of the Friesen project. They were made for last week’s tutorial on the Echidna. Click on the pictures of the Echidna’s to go to the pin on Pinterest.


Do you want to see your work featured on this blog? All you have to do is join the Pinterest Board and pin your weekly projects to the board where lots of other people can see and repin your work. Click HERE to go to the board now.
See you next Friesen Friday,
Until then, Happy Claying,


 Gather black, white, & red
  Next roll a white snake. This white snake will form the chest stripe on the Tasmanian Devil.
 Once your critter is situated on your ornamentation, it’s time to add your facial features.