On Tuesdays, I love to bring you a little polymer clay tidbit, tip, or trick. Today is no different. I’m going to be sharing with you how to use a Heat Embossing Tool with polymer clay. This versatile tool finds its home in scrapbookers & card makers closets. But as clayers, we share with a variety of arts, crafts, and mediums…and therefore…we stole this tool and claimed it as our own too.
Polymer Clay Tip & Tutorial How To Properly Use a Heat Embossing Tool ow.ly/ffEMf Great information for polymer clay artists!
— Kater’s Acres (@katersacres) November 13, 2012
HEAT EMBOSSING TOOL:

WHAT KIND TO BUY:
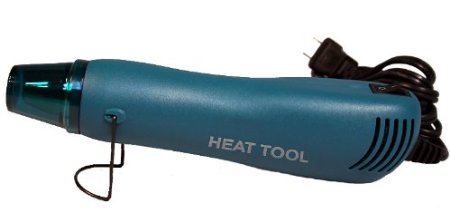
My heat embossing tool is a standard tool pictured at the left. There are literally hundreds of models to choose from. But let me tell you a little secret, for your purposes, they are virtually all the same. My tool is identical to the one above, feel free to purchase this tool from Amazon through my referral. Don’t bother getting a super expensive tool unless you feel that you will use it a lot.
WHAT TO DO WITH IT:

- Use it to put a “gloss coat” of Liquid Polymer Clay on beads for a quick set finish and shine.
- Use it to solidify liquid polymer clay between two wires to make wings for a fairy, dragon, or angel.
- Use it to set embossing powder on the top of a finished piece of jewelry for a crystal clear & sparkling look.
- Use it to quick set items that you don’t want to lose their shape while working on other component parts to your masterpiece.
- Use it to join two clay objects with liquid polymer clay in between for a quick set.
HOW TO DO IT:
Now that you know how you might use it, here’s how to do it properly with a few safety precautions and notes from my “trial and error” processes of using this tool.
Keep the heat tool moving.
Do NOT let the heat tool sit idle. Your polymer clay oven bakes your clay at approximately 230-285 degrees depending on your brand of clay. Your heat tool is approximately 400-700 degrees depending on make, brand, & size. What does this mean? If you stop over your clay at any one point, it will burn! And as all good clayers know, burned clay leaves behind toxic fumes. My advice…don’t burn your clay…keep that tool moving!
Hold It Up
Perhaps the most difficult part is to remember NOT to get too close. Keep the tool moving and approximately 3-6 inches away from your clay at all times. This will also help to prevent burning of your clay.
Quick Set Like a Pro
My favorite feature of the heat embossing tool is that you can use it to quick set a piece before baking it in the oven. Quick setting allows you to “pre-bake” a piece with the heat tool, allowing it to solidify and the polymers to align so that you don’t inadvertently squish a part of your sculpture that was perfect. To do this, follow the instructions above. If you are quick setting miniatures, please keep the tool moving for no more than 20 seconds. Pull to tool away and let your piece sit for 20-30 seconds. Then do it again. Why do you have to do this? Because if you do not do this your piece might burn as it’s so small the heat will distribute throughout the miniature and cause burning due to the extreme temperature.
Practice First
If you have never used a heat tool, you will need practice. How would you like to spend hours on a piece only to ruin it with a heat tool? Not my idea of a good time, but if you don’t practice first, you just might end up doing that. So please, practice with scrap clay first.
Thanks for joining me today,


Wow. This is genius, thank you!!
You’re welcome.
If I was to do this to quick set or for liquid fimo, dose this affect how long I would put it in my oven for? (Dont wont any burning 😉 )
Thank you for your lovely tutorial x
Keep in mind that when you put your piece with pre-cured liquid clay back in the oven it will “Grow” a bit under the new heat. I would actually do the opposite. Bake your piece FIRST … then add your liquid limo AFTER, especially for making “dew drops” and things of that nature.
Could one use their blow dryer instead of a heat gun?
Unfortunately, no. A blow dryer uses forced air which will make your embossing powder go everywhere. A heat gun uses only heat and not forced air lessening the chance of blowing embossing powders.