How to Keep Your Precious Creations from Burning & Cracking

Posted on 13 Comments
How To Keep Your Polymer Clay Creation from Burning or Cracking by KatersAcres


How To Keep Your Polymer Clay Creation from Burning or Cracking by KatersAcres

There is truly nothing that makes me more sad and angry than spending hours making something gorgeous only for it to burn & or crack.  This is horribly frustrating for every polymer clay artist.  Today I’m going to give you my best hints, tips, & tricks to preventing this.  We’re going to go back to basics and learn how to bake polymer clay.

In my opinion, cracking objects is often worse than burning objects.  Objects that are burned can often be covered or disguised by antiquing, covering in a paint medium, using Perfect Pearls, or even Swellegant‘s line of products by Christi Friesen.  However, when a project cracks, there is not a lot that you can do.

Continue reading How to Keep Your Precious Creations from Burning & Cracking

HELP: My Polymer Clay is Rock Hard

Posted on 14 Comments
Hard Clay Questions Answered on KatersAcres Blog

Yes, I Will Help You

Your Questions Answered

[dropcap]I[/dropcap] have recently been receiving several questions sent to me privately from some of my readers.  I try to answer all questions as quickly as they come in.  Feel free to ask me a question anytime and I will answer it directly or here on the blog.

Since this is the first time I have reposted an email that has come to me, I thought it best not to use the name of the person who sent the email.  For this reason, I have “named” the letter and the person who wrote to me in the letter.

Continue reading HELP: My Polymer Clay is Rock Hard

Polymer Clay Tip: Using a Heat Embossing Tool

Posted on 6 Comments

On Tuesdays, I love to bring you a little polymer clay tidbit, tip, or trick.  Today is no different.  I’m going to be sharing with you how to use a Heat Embossing Tool with polymer clay.  This versatile tool finds its home in scrapbookers & card makers closets.  But as clayers, we share with a variety of arts, crafts, and mediums…and therefore…we stole this tool and claimed it as our own too.


Continue reading Polymer Clay Tip: Using a Heat Embossing Tool

Spot Free Polymer Clay CAN Be Achieved

Posted on 11 Comments
KatersAcres Polymer Clay Studio Working Area

Working With Polymer Clay

I recently received an email from someone whose work I admire greatly.  She asked me how I kept my Parker colors so crisp and untainted from the other colors of clay.  I do have a “secret” method to keeping my polymer clay colors from mixing together that I will share with you today.  Working with polymer clay is always fun…but can often be frustrating too. In all honesty though, the “secret” is no secret at all…
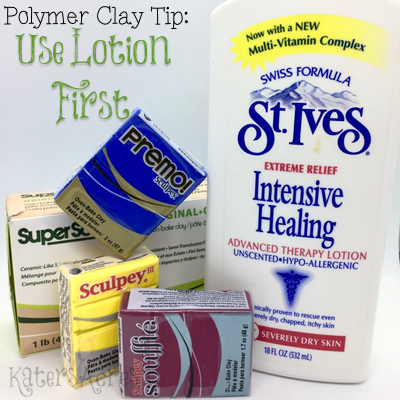
Use Lotion

Kater's Acres Polymer Clay Studio Work Table

I have an entire post dedicated to the benefits of using lotion when you are working with polymer clay.  But using lotion is the first thing I do when I enter my studio.  It’s so important to me and working with polymer clay that I keep a bottle of it right in front of me at all times…you can clearly see the bottle of lotion, right there, front and center.  Make sure to read the article as to why using lotion is a good thing for you and for your clay!

Use Cornstarch

KatersAcres Polymer Clay Studio Working Area

By looking at my polymer clay studio work area here in these photographs, you can see many of the things that I use often.  The other thing that you should notice in this photograph is the huge container of cornstarch.  I don’t use corn starch often, but I use it when I have colors that I know taint my hands, work surface, and other clays.  Most of those colors are any shade containing reds, black, or green pigment colors.  In order to use cornstarch to prevent my colors from bleeding, I have an intricate process.  Feel free to use my process and achieve nice results working with polymer clay.

HOW-TO USE IT:

Tap your moist fingers into the corn starch (get the moist by using lotion or wiping with a baby wipe).  Then rub that cornstarch onto your hands (similar to washing your hands).  Then lightly tap the cornstarch with your fingers again and rub onto your work surface.  Then play with your clay like normal.  When you are done there should be very little of the color on your hands and on your work surface.

Please remember that using cornstarch also will keep your clay from sticking to the surface and other clays…so use sparingly!

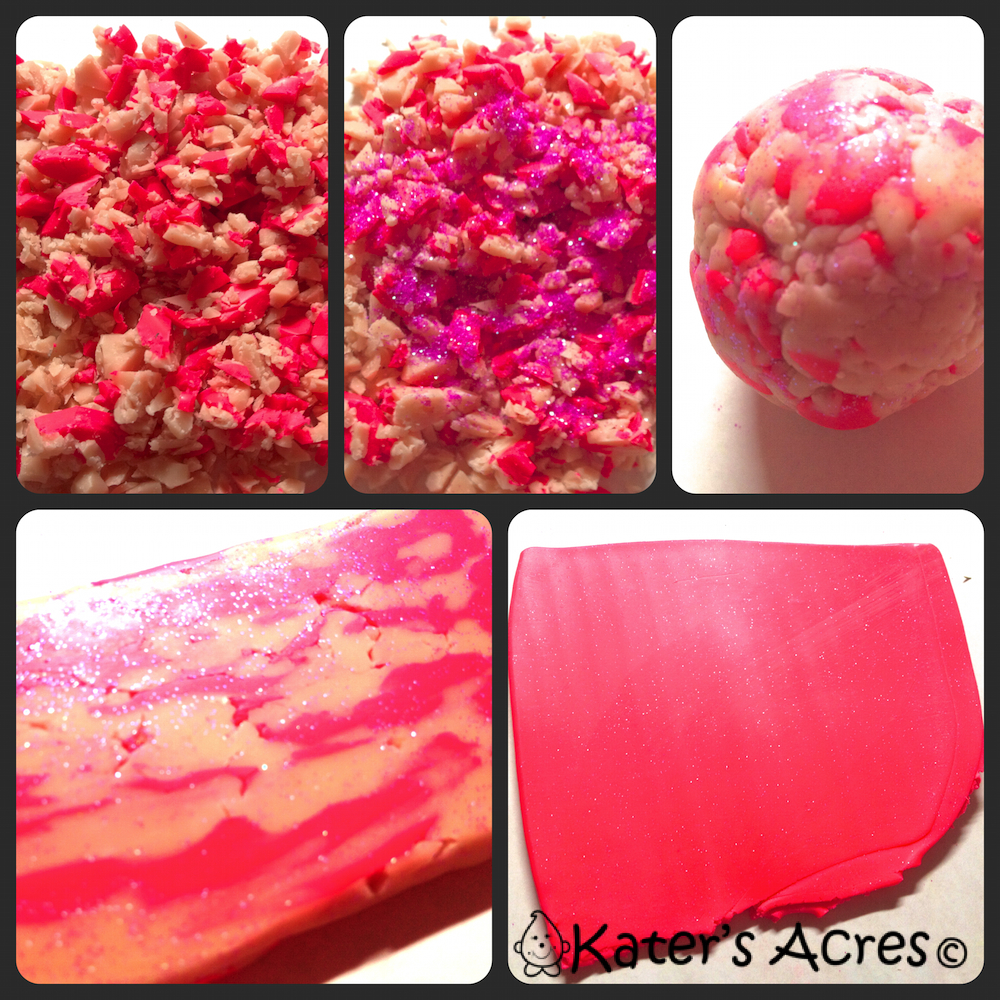
Separate Your Colors

Polymer Clay Color Palette for Oct. 15th, 2012 from KatersAcres

Often on my FaceBook page you will see me post pictures similar to the one here at the left: a color palette of something that I’m working on for the day.  What I didn’t notice until after I took this picture, was that the white clay on the bottom looks like my work  surface.  It’s not my work table, yet it’s so white that it almost looks that way.

In order to prevent color bleeds, I always start a project with an idea in mind.  I rarely start from scratch.  In this way, I condition the lightest color first, following through to the darkest colors.  In the case of this palette I conditioned the clays in this order: white, gold, green, brown, red, & black.  In each, if any particles were picked up from the previous color, it seamlessly blends into the clay with no “ack, I got red onto my white” spots.

First Thing’s First

Autumn Harvest Parker StoryBook Scene by KatersAcres

In the same way, when I begin a design, especially my Parker StoryBook Scenes working on the lightest color first.  In most cases (except Christmas designs) Parker is a bright and vivacious yellow color.  I always make Parker first.  Since Parker is the featured element of all my StoryBook Scenes, he must be perfect.  So in whatever you are working on, be sure that your primary object of focus is the item that you do first, while your hands are clean!

When All Else Fails 

When all else fails, after you’ve successfully done everything you can think of to avoid color bleeding, you still have red spots on your white and blue spots on your yellow.  When this happens, you must do what you must…break it out…the bottle of rubbing alcohol.  Rubbing alcohol is my secret weapon…but truthfully something I use only about once a week.  Read my post on rubbing alcohol to see how to effectively use this to remove stains from your hands & work surface. (And yes…you can see my bottle of rubbing alcohol to the far left on my work surface.  Yep, I don’t use it that much, only when I have too.)

If you think before you begin your clay process, you should have no trouble with your polymer clay colors bleeding on you.

Thank you for being a part of the Kater’s Acres Family, Sculpting Blessings,

KatieSignature

Tutorial: Cut Millefiori Canes Like a Pro

Posted on 7 Comments
Cut Perfect Millefiori Cane Slices with this Quick Tutorial from Kater's Acres

One of the hardest things to do is to cut a cane in an even, thin slice, without any drag.  When I first began working with polymer clay millefiori canes, both raw & baked, I had the hardest time cutting them in thin, even slices.  One side would always be thicker than the other or I’d adjust my blade halfway through the slice and create very unpleasant “drag marks” on the sliced piece of cane.  After several years, I got smart and solved my problem…

It’s not easy to cut a millefiori cane with accuracy and precision every time.  Trust me, I know.  But there are a few things that you can do to make your millefiori cane cutting adventures a little easier.

Continue reading Tutorial: Cut Millefiori Canes Like a Pro

Tools of the Trade

Posted on 5 Comments
Polymer Clay Tools with Parker by KatersAcres

Polymer Clay Tools from Every Department!

Polymer Clay Tools with Parker by KatersAcres

My tip for you today is a reminder of what you can use when working with polymer clay.  Working with polymer clay takes time, energy, and is the best reason to dig into every other craft & hobby out there!  My husband said to me one day while wading through every single aisle in my local Pat Catan’s, “why can’t you just crochet or something?”  I laughed because I knew exactly what he meant.  What he meant was that there’s a clay/sculpting aisle and we go down it to shop, but then I hit up the stamp section, knitting section, button & sewing aisles, plus the flower section, baking/cooking section, jewelry section, and eventually end up in the paints with a final trip through the clay aisle again (just in case I missed something).  What is it about clayers that makes this happen?

Continue reading Tools of the Trade

Hard Clay Blending Technique

Posted on 21 Comments
Easy Blend Polymer Clay Technique by KatersAcres

Hard Clay? No Problem!

My Easy Blending Polymer Clay Tip No Special Tools Required

One of the things that every clayer struggles with at times is rock hard clay.  Clay that does nothing but snap, break, and never get soft.  The easiest answer to this problem is a food processor.  But, you may not have a food processor and that’s okay.

Today’s polymer clay tip will show you how to become friends with your clay, warm it up, soften it, make it malleable again, and even blend it to perfect.  In fact, with this easy polymer clay tip, you don’t need any special tools or machines.  You only need your hands, clay blade, acrylic roller and pasta machine.

Continue reading Hard Clay Blending Technique

Using Lotion with Polymer Clay

Posted on 20 Comments
Polymer Clay Tip - Use Lotion First from KatersAcres

POLYMER CLAY TIP OF THE DAY

Haven’t you ever noticed how after claying all day (or part of the day) your hands are dried out, your cuticles begin to tear, and you get a large number of hangnails?  This is because the clay (though non-toxic and gentle) takes the moisture that is in your hands and absorbs it…all of it.
This being said, there are several things that I have on my studio table at all times.

Continue reading Using Lotion with Polymer Clay

Repurpose X-acto Blades Using Scrap Polymer Clay

Posted on 3 Comments

 Repurpose X-acto Blades Into a Great New Tool

Repurpose x-acto blades? Absolutely you can do that! This simple and quick tip had a huge response in last week’s email, twitter, & even on FaceBook.  It was shared, retweeted, and commented on more times that any previous tip I had posted. So today I will show you how you can take that old, grungy, and slightly beat up old cutting blade and repurpose x-acto blades into something more useful.

Continue reading Repurpose X-acto Blades Using Scrap Polymer Clay