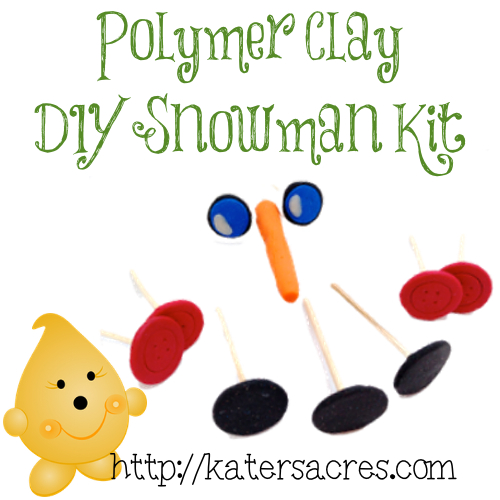
Everyone Loves DIY Snowman Kits
There aren’t many people who don’t like snowmen…unless you live in the tropics where snowmen do not exist because…well, they melt. But for those of us who live in areas with four seasons, we are blessed to have the ability to make snowmen when those gorgeous white flakes arrive. Every year I anticipate the coming of the snow, making of snow angels, and building the cutest snowmen in our country acre. But there’s always something missing…in my head, a snowman’s eyes tell his story. Well, for clayers and crafters, here’s a great weekend project for you. A DIY Snowman Kit. Perfect for Christmas gift exchanges this year.
BUILD YOUR OWN SNOWMAN KIT

Time estimates include conditioning of clay & baking time. Supply costs are for all 6 colors of clay, dowel rods, & TLS.
Estimated Time: 60 Minutes
Total Cost for all supplies: $20.00
Polymer Clay DIY Snowman Kit Weekend Challenge on my Blog Today ow.ly/fHrBs Time to make: One Hour – Total Cost: Less than $20
— Kater’s Acres (@katersacres) November 30, 2012
Step One: Condition Your Clay
Properly conditioned clay is smooth and does not crumble or break when bent. This means kneading with your hands, running through a pasta machine, or use a brayer or acrylic rod to condition the clay. Please know that improperly conditioned clay will be brittle and can crack or break when baked.
Step Two: Make “Coal” Nuggets
Shape coal nuggets for the mouth of the snowman. You can make as many coal nuggets as you would like. I made three nuggets for my snowman kits, but you can make 5 or 7. I prefer odd numbers as then there’s always a clay lump in the middle of the mouth.
Step Three: Make Buttons
You can make any clay color buttons you wish. For this snowman kit, I chose red buttons. Remember, for an outdoor decoration the simpler the “buttons” the better.
Step Four: Make a Carrot Nose
Make a long, rough, and nicely textured “carrot” for the nose of your snowman. If you would like, you can use acrylic paint to add an “ages” or “dirty” look to the carrot. In my snowman kit above, I left the clay natural and not painted. I wanted my snowman to have a whimsical and cute look.
Step Five: Make the Eyes
The eyes will take the longest time, choose to make them in whatever color combinations that you would like. For my eyes, I embedded black with blue centers on white clay. I added translucent clay in a “smooshed” crescent shape for that “glisten” that all snowmen have in their eyes.
Step Six: Embed Dowel Rods
The final step for these cuties is to embed dowel rods into the BACKS of the pieces so that they can be easily smooshed into the clay. To do this, add a couple drops of TLS to the dowel rod and then smoosh it into the back of the piece.
Step Seven: Bake the Clay
Depending on the type of polymer clay you purchased, different clays require different baking times. Read the directions and follow them, precisely. Be careful not to burn the clay or the undercook your clay. Burned clay released toxic fumes. Undercooked clay is brittle and will easily baked.
Step Eight: Package it Pretty & Add Accessories

Thanks for joining me today,


What an absolutely adorable idea!!!! I’m am definitely gonna make myself and maybe my coworkers one, so we will be ready when the snow come!!!!
Just one quick question, for us clay newbies, what is TLS???
Hi Elizabeth! TLS is “Translucent Liquid Sculpey” – basically liquid polymer clay. It seals pieces together and acts as a type of glue…but it is also much more than that. You can also use “Bake & Bond” though too if you have that around.
How cute. Almost makes me wish I had a classroom full of elementary school kiddies to work on this with me. (Almost)
Great idea. Thanks for sharing.
Kids would love this!
Such fun Katie! And I love your idea of adding the dollar store scarf and mittens and give as a gift!
Thank you Trina! I’ve made several of these for gifts this Christmas.