Polymer Clay Gargoyle Tutorial
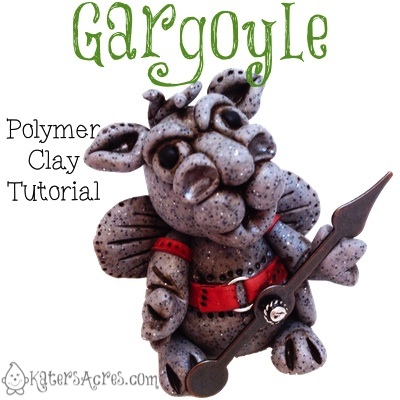
So what’s our project? Our project this week is the Steampunk Gargoyle! Three cheers for Gargoyles!

Made for the Friesen Project 2013
A Few Notes on ‘Voice’ & Thoughts About the Friesen Project Thus Far:
Before we begin, you’ll see my gargoyle above. You will notice that as many of the recent tutorials, mine is very different from Christi’s. Why? We have talked before about voice and finding your voice in clay. Finding your “voice” is about expressing yourself as an artist. I am so proud of each of you who are posting your results on our FaceBook Group Page. WOW! You are really expanding, using Christi’s tutorials more as a model and allowing your style to come through … and that’s exactly what we set out to achieve by the end of this project. For those of you who have achieved this – I AM PROUD OF YOU! For those of you who are still working on it or just joined us late in the year – don’t give up – You CAN do it! Be truthful to your own style, likes, & dislikes to let your voice shine though.
Get the Steampunk Gargoyle Project
We are down to our final few Steampunkery projects. Christi’s gargoyle is majorly awesome. Your assignment is from her book this week on page 56. If you’re not into scary or want a different kind of Gargoyle, feel free to follow this tutorial. In invite you to turn to page 56 and you’ll see exactly what I’m talking about … pure creativity and awesomeness! Here’s why I made my different … I don’t do scary, I do cute. I don’t even do “Halloween” decorations in my house … why … yep … too scary. So this being said, I made my own steampunk gargoyle and turned him into a figurine. Although if I had a nifty hat to put a pocket gargoyle in (like Christi does in her book), or if I wore a lab coat, or if I wore shirts with pockets … I’d make Christi’s pocket version in a heartbeat!
NOTE: You do NOT have to purchase this tutorial to do this week’s project. Simply follow the tutorial in Christi’s book. If you would like a more whimsical gargoyle, this is the project for you. Or try this updated Dog gargoyle project here.
Materials:
Christi Friesen’s Steampunkery (on page 31)
- Your choice of polymer clay in either granitex or granite from Fimo Soft. (See Christi’s Book for alternate methods of mixing clay to get the desired “stone like” effect.)
- Round circle cutter set to help you measure even portions of clay.
- Steampunk gears, gadgets, & gizmos and lots of them!
- Mica Powders (Several Options – My preference is a Perfect Pearl Set as they are permanent & do not require a varnish due to the resin )
- Acrylic paint in a dark color to use to add an “antique” effect – my preference is brown or sienna
- Acrylic paint brush (please use a different brush for mica powders, chalks, paint, & gloss finishes)
- Baby wipes or soft sponge
- Varnish
- Metal Craft Wire (I used 18 & 28 gauge but any flexible soft wire will do)
- Sculpting tools
- Exacto Knife
- Oven – to bake your finished piece in
This polymer clay gargoyle tutorial includes:
 Complete written instructions for a Gargoyle Figurine similar to that at right
- Dozens of Color Photographs featuring the Gargoyle at right in process
- Step by Step Collage Graphics
- 7 pages of fun & bright colors
- Design Ideas & Notes
- Polymer Clay Hints & Tips
- Additional Project Ideas
- This tutorial does NOT include: conditioning clay instructions, Steampunk decorations (like adding a buckle), or adding an antique effect. (Click on the links to go to those tutorials.)
What You’ll Get in This Tutorial
This tutorial includes instructions for making and designing your polymer clay gargoyle. This tutorial includes full color photographs, steps in outline format, hints, ideas, and other tips for creating a clay masterpiece. This tutorial assumes a basic knowledge & understanding of polymer clay & its workability.
Get the Tutorial Here
The Friesen Project
The Friesen Project is done in conjunction with Christi Friesen. All tutorials are retaught here with her expressed permission. Please make sure to read about the project here, and get answers to the most common FAQS here.
Links in this post go to Amazon where I am an affiliate.
Sculpting Blessings,


I thought this link was to take me to a Steampunk Cog tutorial. This is the gargoyle tutorial from last week.
Thanks for all the additional steampunk tutorials you have generously provided!
Thank you so much Katie, LOVE it!
You are welcome Tracey!