
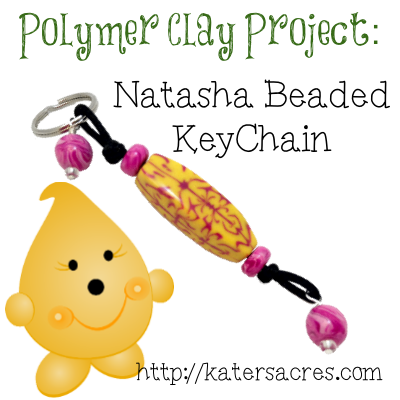
Polymer Clay Projects Requested
I love it when my fans & readers have specific polymer clay projects in mind. I have had several requests lately for a fun beaded project tutorial. As many of you know I’m not really a jewelry person, not because I don’t like it, because I most certainly do, but rather because I’m not a person that tends to “accessorize.” I wear a wedding ring & my earrings and that’s it. Sometimes you’ll catch me wearing a watch, but other than that … nadá. So while I love to make beads, since I don’t wear jewelry (or sell it in my Etsy shop), I’m never sure what to do with the beads. So for those of you who are like me, here’s a really fun handmade Natasha Bead Keychain. Let’s get started, shall we?
Materials Needed:
 Your choice of polymer clay
- Polymer Clay Blade
- Bead baking rack
- Craft Oven
- Black Rattail Satin Cording
- Lighter
- Varnish
- Acrylic paint brush
- Baby wipes
Let’s Get Started on Your Polymer Clay Projects
I’m going to explain how to make a Natasha bead to my best ability. Natasha beads are a lot of fun and yield surprising results every time. This being said, if you can not follow the directions I give for the Natasha bead, additional resources will be given at the end of the video.
Step 1: Make a Twisted Log
 First gather your polymer clay. You will need about 0.50 ounces or about 1/4 a block total for this project. The bead that I made I used leftover cane ends to make. You can use scrap clay or pick colors of your own to make this bead. Once you have gathered your clay, roll it into a log. Then twist it and roll it again. Repeat about 4-5 times. Then make a log about the size you want your final bead to be. The log at right is approximately 1.5 inches long.
HINT: If you want a more intricate pattern, twist more than 4 times. If you want a basic, less intricate pattern in the middle twist less than 4 times.
Step 2: Cut it in Half
 Easier said than done, I know. For me, it is easiest to turn my log so it is going north-south on my work space instead of east-west. I can see the clay and cut more evenly when it’s north-south. Try to cut this log in half as evenly as possible with your polymer clay blade. If you are really bad judging halves of something, you can also use a ruler and measure out from the center of your log, this takes longer but can give very precise results.
HINT: I begin by scoring the clay first. I gently impress my blade into the surface and create a tiny indent. I then lift my blade, and look at the score line to see if it is in the middle.
Step 3: Separate the Halves & Cut Again

 This part can be the hardest for many people. It’s taking two halves and cutting them in half, again. All I can tell you is do not stress and worry or this task becomes even harder.
Now for the fun part!
Step 4: Align All the Pieces
 Turn each end piece outward 90 degrees and realign the side patterns and secure it on the back half of the piece. When you are done doing this, your bead should look something like this… I have chosen to make my bead a rectangular shape with pointed and squared off edges. You can make whatever shape you’d like. You can even cut it and make smaller beads from this one longer bead.
Step 5: Make Complimentary Beads
 To make symmetrical beads, I used the inside (pink) highlight of this cane and swirled it with some white to make a delightful marbled effect. In order to make the same size rounds and rondelles, I simply used a cookie cutter to “measure” the amount of clay and then rolled balls of clay from there. Once you are done making all the rounds and rondelles for your project, make sure you pierce your beads to make holes. In the case of this project the holes had to be at least 2mm in the opening to fit my satin rattail ribbon through.
Step 6: Finishing Steps
 Smooth out any fingerprints on your beads and place them on a bead rack in your polymer clay oven. Bake the beads according to the manufacturer’s suggestions. I baked these beads (and other things) at 275 degrees (I use Premo) for an hour. Once the beads are cool, string them on your rattail, and use a lighter to melt the ends of the cording onto itself so the knots are tight. Then varnish your beads and let them dry.
HINT: Place your finished piece (varnished and all) back into the oven at 200 degrees for 10 minutes to harden the varnish on your beads, sealing them and making a super rigid surface.
That’s it! You are ready to go! Now you have a beautiful keychain to tote your house key around on. I hope you enjoyed today’s polymer clay projects and tutorial.
Thanks for joining me today,

I am going to be teaching a group of women how to do polymer clay, some for the first time. This is a really great project to do. Great results, minimum casualties. ;D. also doing the flowers that I put on my dolphin pair. They are very simple, and look like embroidered flowers. Thanks for reminding me of this Katie.